I do User Story Mapping. I do Impact Mapping. And I’ve recently added another forming of ‘mapping’ to my arsenal: “Experience Mapping.” I learned about Experience Mapping through this very helpful guide by Adaptive Path. An Experience Map is useful tool for capturing and presenting key insights that occur across user experiences with a particular product or service. Similar to user story mapping, an experience map helps to gain a better understanding of ‘how’ and ‘why’ people interact with your product or service.
Adaptive Path’s Guide to Experience Mapping contains some useful definitions (see Fig. 1 below) as well as the four key steps involved in creating an experience map (see also Fig. 2 below):
- Step 1: Uncover the truth — This first step in creating an Experience Map is to study customer behaviour and interaction across channels and touchpoints. Typically this comes down to making sense of a whole heap of data — both quantitative and qualitative (see Fig. 3 below). For instance, if you’re looking to understand how customers engage with your mobile app to purchase an item, it’s worthwhile to look at all the existing data you can gather, varying from analytics data to user interviews or complaints. Don’t expect your initial data to be very organised, but you should be able to start spotting themes and patterns quickly. Keep in mind the following perspectives: what’s the customer doing, feeling and thinking.
- Step 2: Chart the course — When outlining the Experience Map, the key thing is to make it a collaborative experience by getting all the relevant ‘stakeholders’ to go over the experience map and the research that you’ve done. The main components of the experience map framework are: the lens, the customer journey model, and the takeaways (see Fig. 4 below)and I’ve included some great examples of effective Experience Maps (see Fig. 5 -7 below). Running an Experience Mapping Workshop is a great way to get people involved in charting the course and the guide provides some great recommendations on how to best facilitate an Experience Mapping Workshop (see Fig. 8 below).
- Step 3: Tell the story — Adaptive Path stresses the importance of deciding early on what is and what isn’t going to be involved in the story that you’re looking to tell.This means separating important insights from nice-to-have details, while identifying the relative priorities among your building blocks. Take a moment to evaluate your work and identify the key components of the story your map will tell. Adaptive Path provides some useful suggestions for how to best reach the end of the user journey successfully: (1) have a point of view, (2) consider your audience and (3) design for impact (see Fig. 9 below). Sketching your story is good way of visualising and fleshing out your story.
- Step 4: Use your map — Having a nice Experience Map is no good if you don’t share it widely across your organisation and use it as an ongoing reference point for your product development process and product decisions. Adaptive Path provides some great pointers for ‘next steps’ once you’ve a got an Experience Map in place. For example, you can use your Experience Map as a tool to assess product opportunities or making product decisions (see Fig. 10 below).
Main learning point: I learned an awful lot from Adaptive Path’s approach to Experience Mapping and creating such maps is a great way of capturing insights and interactions across the user journey.
Fig. 1 — Key definitions related to experience maps — Taken from: http://mappingexperiences.com/
- Channel — A medium of interaction with customers or users. Print, the web, mobile, voice calls, and brick and mortar locations are all common channels for reaching out to and interacting with customers. A channel defines the opportunities or constraints of a touchpoint.
- Touchpoint — A point of interaction between a person and any agent or artefact of an organisation.These interactions take place at a certain point in time, in a certain context, and with the intention of meeting a specific customer need. Create a shared frame of reference around the customer experience. Build organisational knowledge of customer behaviours and needs across channels.
Fig. 2 — A graphic overview of the key four steps involved in experience mapping — Taken from: http://mappingexperiences.com/
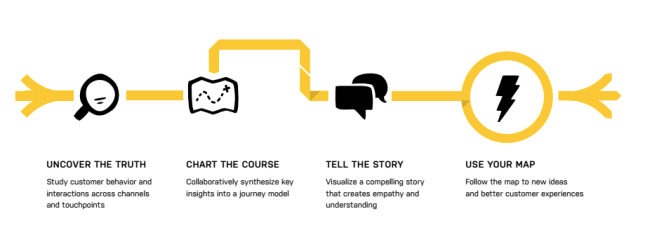
Fig. 3 — The building blocks of experience mapping — Taken from: http://mappingexperiences.com/
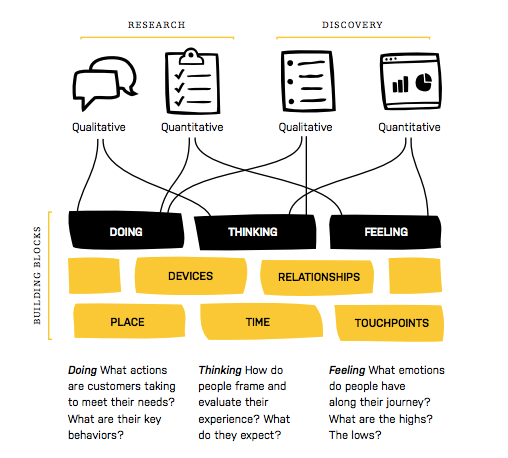
Fig. 4 -The main components of the experience map framework — Taken from: http://mappingexperiences.com/
- The lens — The lens is an overriding filter through which you view the journey, such as a persona, more general experience principles, or a value proposition.
- The customer journey model — The customer journey model depicts the range of interactions customers have across channels, touchpoints, time, and space in pursuit of satisfying one or more needs.
- The takeaways — The takeaways summarise key findings from the experience mapping process. The moment you conceive of a plan to map the customer journey, you need to chart a course to actionable results. The takeaways signal which way you are recommending the organisation head next. Your takeaways could include: → Strategic insights → Recommendations → Design principles. Takeaways are typically added to the map late in the process, once you have begun to pivot from understanding the current state of your customer experience to envisioning the future state. There are different takeaways you could include, but they should answer the questions “So what?” and “What now?”
Fig. 5 — Example of an Experience Map — Taken from: http://www.adaptivepath.com/ideas/the-anatomy-of-an-experience-map/
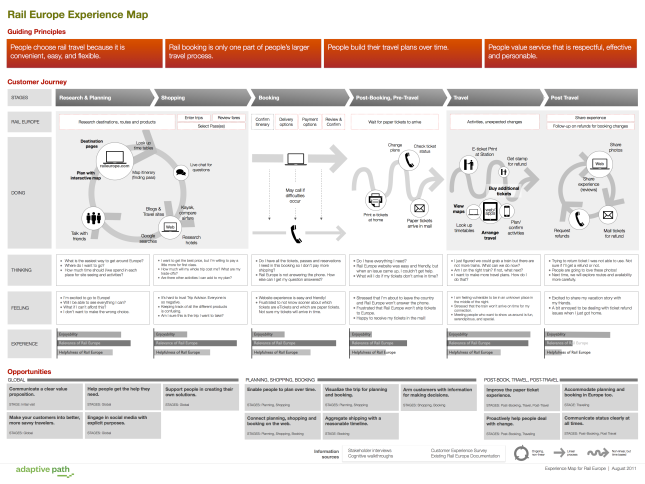
Fig. 6 — Lego Experience Map — Taken from: https://uk.pinterest.com/uxjam/journeys/
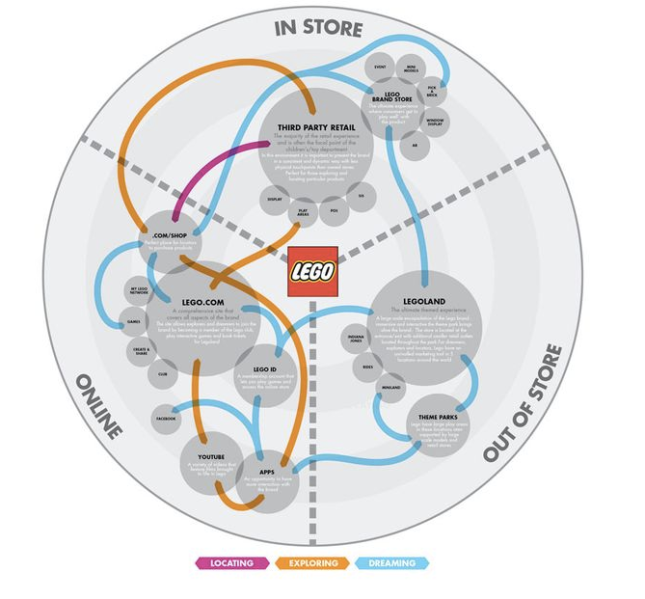
Fig. 7 — PeopleSmart Experience Map — Taken from: http://www.lorettaneal.com/peoplesmart.html
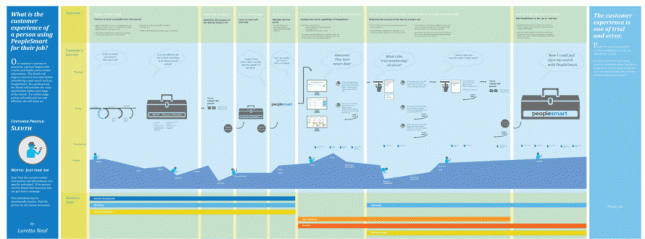
Fig. 8 — Recommended steps for facilitating an Experience Mapping Workshop — Taken from: http://mappingexperiences.com/
- Set the context — Prepare a short presentation to catch everyone up on your discovery and research work.
- Organise yourselves — Divide participants into teams of four to six. Make sure each team has a balance of different roles and functions.
- Deconstruct — Each team will need to go through the research notes and pull out the building blocks.
- Stage — As the sticky notes build up, have one person from each team move them to the butcher paper, starting with Doing.
- Construct — From this point on, the team should start to group duplicate stickies and begin finding relationships among them.
- Shape — By the end of the session, each group should be moving from figuring out the customer journey to arranging the key insights into a story.
- Workshop Supply List → Butcher paper → Painter’s tape → Black sharpies → Sticky notes (5 or more colours) → A camera
- Facilitation Tips → Keep groups to six people or fewer → Create handouts with clear instructions → Provide copies of research notes → Remember to take breaks → Share out across groups → Take lots of pictures.
Fig. 9 — Suggestions to hep turn an Experience Map into a compelling story — Taken from: http://mappingexperiences.com/
- Have a point of view — Can you summarizse the key points you want someone to walk away with after viewing the map? What story do you want them to tell to other people?
- Consider your audience — What kind of details will help them best understand the story? Which insights are essential for them to make good strategic and design decisions?
- Design for impact — What immediate next steps do you want your map to initiate? What other uses of the map are you hoping to encourage in the short-, mid-, and long-term? Your goal is to craft a communication piece that can stand on its own, inspire new ideas, and have longevity.
Fig. 10 — Pointers for ‘next steps’ once you’ve a got an Experience Map in place — Taken from: http://mappingexperiences.com/
- Issue / Opportunity Identification and Prioritisation — Using the structure provided by your map, chronicle issues or opportunities for addressing customer pain points at each stage of the customer journey. Prioritise according to business and customer value. This method helps you quickly work with stakeholders to identify high-value areas of opportunity.
- Experience Storyboards — Using your map and simple storyboard templates, along with additional tools like personas or experience principles, use rapid ideation to generate stories of future experiences. This approach provides stakeholders with a forum for ideas grounded in the insights of your customer journey.
- Future Experience Mapping — Using the map as a reference, define the ideal customer journey through mapping out what customers would ideally do, think, and feel as they interact with touchpoints on the way to satisfying their needs. This method encourages cross-functional collaboration to define cross-channel experience principles.
